Sunday, September 14, 2014

The September Project, Part V - We Have 3D Print!

In Part IV, we finally got all the necessary software downloaded and installed, only to find it inoperable due to a computer connection that didn't "exist". So today, once more into the breech, we try to get a first print going with our Bukito portable 3D printer.

Before I try my idea about powering up the Bukito to connect to the com port, I notice that there is an Arduino app on the desktop now. I open it and try connecting to the USB port with a Teensyduino option, and there it is. But launching Repetier-Host still shows the printer in a Disconnected state.

Okay, that's not it. We turn on the Bukito, and hear various motors power up, but the Repetier printer status stays stubbornly Disconnected. 

Suddenly, a driver download notification opens in the lower right corner of the screen. Printer connected on COM3, it tells us. VOILA!

We now have the option to select COM3 as the serial port in the Printer Settings, and save that setting to our "Bukito PLA on USB" printer. I will set up other printers for other filament types, so I can vary the temperature configuration. (Eventually we will add a heated bed to the printer as well, and that will require printer settings to change.)

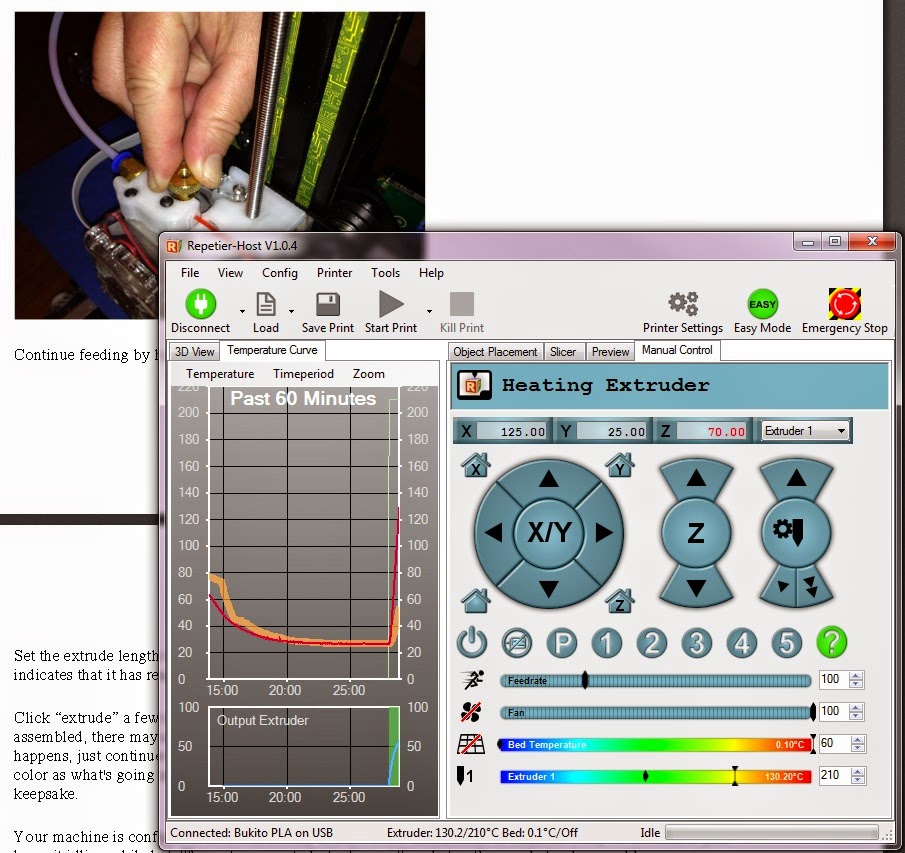
With the correct port pointed out, we can now connect Bukito PLA on USB and the controls for the test flight and tramming process come alive.

First Noodle

Following the step-by-step instructions from Deezmaker is suddenly simple. It seems the settings we guesstimated yesterday are appropriate, because the test for homing on X, Y and Z axes goes off without a hitch.

If there is any issue with the instructions, it is that sometimes it is not clear whether the control cited in a step is in the Repetier-Host program or on the Bukito itself. We figure it out, though, with assistance from the online manual for the Repetier software, and my spouse's memory of discussions from the Deezmaker forums.

The moment we pop the Manual extruder control, getting a dribble of the white filament that was still in the machine, is magical. I can well understand why people are driven to preserve their "first noodle". 

We carefully set it aside, as well as the first red noodle of PLA from our own reel.

Tramming With the Downloaded Script

The second part of the test flight involves downloading the G-code file that holds the instructions for a sliced print. We thought it would start printing right away, but the first instructions send the nozzle to the right front corner of the bed, then pause until you set the bed vertical position to almost touch the nozzle in that corner. We tested with a piece of paper, which just slid between the bed and nozzle, with a palpable "friction".

Clicking the Continue Print button then moves the nozzle to the front left corner and pauses to allow a second adjustment. This corner needed adjustment—we shifted the bed too far from the nozzle at first, and spent quite a while backing it up to the correct position.

The tramming then proceed to the bed's back edge, and back to the front corners to verify that no additional adjustment was required.

Suddenly—Printing!


With the red PLA filament loaded into the printer, we watched as the head moved around the bed margins. It was thrilling to see a line of red plastic appearing on the blue tape, forming a tight spiral, rounded corners on a rectangular outline. The line of plastic traces the outline of the solid shapes in the middle of the test flight print, and the cups began to rise from the bed.

The Repetier software does a good job of predicting the time required to print. Since we haven't mounted the extruder fan yet, we have deliberately kept the print speed low, but the whole first print still takes only 15 minutes.

What's Next?

The September Project is complete, because we've got the printer working. But there are some things we still want to explore, not necessarily in this order:

  • Mount the extruder fan so we can speed up the feed rate
  • Download (and scale for the Bukito) a 3D model from a library. I have my eye on a tentacle stand for my Kindle, which sits on Thingiverse as "213990"
  • Modify G-code to tweak a print
  • Figure out how to print from an SD card
  • Create our own 3D model using Trimble SketchUp (a simple one is a cookie cutter, a more complex idea I'll hold back as it may be commercially useful)
  • Develop a presentation incorporating 3D model creation, G-code controls, and production of prints, for delivery to middle-school or high-school STEM groups.
That last was our original "excuse" for getting the 3D Printer in the first place. I do not say motivation; the motivation was two people who both wanted to play with one ourselves.

I'll keep you posted.

The September Project, Part IV

In Part III, I finished playing with the Trimble Sketchup app, and found a way to safely download the driver software for the Bukito. Night before last, I downloaded drivers and installed them on my spouse's older Windows system, and trundled the cart on which the Bukito currently rests into the other office.

Yesterday we finally started playing with the actual printer, actually hooked up to power and actually connected to the computer. Exciting, right?

It would have been, except that as I read the instructions under the First Print tab, the first line says "Open Repetier Host (see “Software Downloads” at bukobot.com)." Obviously, I missed that in the suggested software table—probably because I was stressed about the compatibility issues in Step 1—but it's not too late. 

Sure enough, Step 2 under the Software tab says we need to download several pieces of software:

  • Cura, a slicing application
  • Cura documentation
  • Repetier-Host, which seems to provide a front-end for the printer operations
  • Slic3r, which is included in Repetier-Host and downloaded with it (no separate download)


Why we need both Cura, a slicing application that includes a host, and Repetier-Host, which includes a slicer, is not immediately clear. I hope it will become more apparent as we begin to use them.

The helpful step-by-step instructions for starting Slic3r to generate folders needed to hold the downloaded Cura profile just adds to this confusion, but it goes just as the instruction set describes—that's a plus!

A more troubling statement is set into a colored box to emphasize it: "Your printer's Azteeg X1 or X3 controller comes preloaded with Marlin 3D printer firmware already configured for your Bukobot/Bukito model. You don't need to install printer firmware in most cases." Since the top of the page says clearly that the Bukito has an Arduino X2 controller, I hope the statement applies in the same way as for the Bukobot X1 or X3 controller. 


First WHUH?!


Under the Settings tab, the careful step-by-step instructions for what settings to enter into the suggested Cura and Repetier-Host downloads that will actually send our 3D models to the printer don't always match what I see on the screen. 

For example, the techish "Check Remove M105 Request from Log" shown in the instructions doesn't appear anywhere on the Repetier-Host Printer Settings screen. Reading on in the Deezmaker instructions, I find a G-code statement (for the Cura app) with a comment "M104 S0; Turns off Extruder heaters". So if M104 controls the extruder heater, maybe M105 is a temperature sensor, and the check-box for "Remove Temperature Sensor Requests from Log" is the one that should be off.

We go on, filling in settings for both applications by guess and by gosh, and at last (well into the dinner hour), we are ready to start the engines!


Second WHUH?!


When I follow the instructions for Repetier-Host under the Test Flight tab, the application's Manual Controls panel shows the printer Disabled. Because it is disabled, I cannot go forward with entering X, Y and Z values as directed; the controls do not respond at all.

I click Connection in the app's menu bar, and learn that the port I'm trying to attach (COM1) doesn't "exist".  I suspect there was a slip in the driver download/install process, so this issue might be mine. It isn't until I'm in bed last night that it dawns on me: maybe the printer needs to be powered up for the connection to go live.

I'll publish this, then we'll dig in again.

Saturday, September 13, 2014

Disarmed in the Battle of Wits

After hearing the promotional interview with the author on a radio gardening program, I expected to enjoy Bill Adler's Outwitting Squirrels: 101 Cunning Stratagems to Reduce Dramatically the Egregious Misappropriation of Seed from Your Birdfeeder, a humorous treatise on defending bird feeders from "furry-tailed rats". I bought it that same day for my Kindle. 

Unfortunately, I soon learned that most of the funny bits from the book had been read aloud on air by Bob Tanem, host of KSFO's In the Garden, or shared by the author during that interview. The rest of the book is extremely dry, and mostly consists of a list of the commercially-available bird feeders, rated for features like ease of refilling, attractiveness, and of course, Squirrel-Proofing.

Don't get me wrong—a rating list for technical aspects of squirrel-proofing bird-feeders is valuable. It just wasn't what the interview had led me to expect.

The 101 Stratagems of the sub-title comprise a similar mix of sober seriousness and whimsical hilarity, with a few deliciously mean or technically treacherous options thrown in. Adler has obviously done his homework—and presumably has seen many more "squirrel-oopsies" than he describes in the text. He may have been reluctant to share yet another "squirrel skids off slick baffle and lands on his posterior four feet below feeder" scene.

If that is the case, I think Adler missed the main reason those who dream of outwitting squirrels might have bought the book. Sure, it helps to know which feeder works best to fend off the arboreal rodents. But we also want to see them defeated! 


Hint for the fourth edition, Bill:  If we can't see squirrels defeated in our own yards, we'll settle for reading about it. More dynamite, electricity, and greased feeder roofs will nicely balance the dry technical data.

Friday, September 12, 2014

Romance, Cultural Odyssey, and Self-Discovery

Sadly, unavailable on Kindle.
My first encounter with John Ball and his novel Miss One Thousand Spring Blossoms was in a Readers Digest Condensed Book version. It was likely one of the best condensations of a novel in the series, because even in the condensed format, the story had power.

Americans in the 1950s generally viewed Japan as a source of poorly-put-together radios, of Cracker-Jack-level engineering. Richard Seaton, a mid-level American engineer, shares that opinion without ever having been to the country. 

Seaton also agrees with his employer that his own skills are lacking. When they give him the opportunity to travel to Japan, this disconnect will trigger a shattering change in his life.

Miss One Thousand Spring Blossoms can be read with enjoyment on several levels, as a romance, as a cultural odyssey, or even as a clever presentation of mid-20th-century industrial practices in Japan. It succeeds on all those levels, but my favorite theme is the growth of the American protagonist Richard Seaton.

The gentle love story between the American engineer and the beautiful Japanese woman (the geisha whose working name is the title of the book) provides an artful camouflage for the way Seaton falls in love with Japan and its timeless culture. 

He arrives in Japan with a preconceived notion of a feudal, even primitive, Japan, supported by the way his task had been presented to him by his employers Stateside. The contrast between American and Nipponese engineering philosophies is a greater surprise to the American engineer than his first encounter with a public bath.

But even more striking is the way that Seaton, in learning to value the people he has come to Japan to work with, begins to accord his own abilities a greater value. 

I wish this novel was available for the Kindle, because it deserves a much wider audience than it has achieved in the bound, condensed or paperback volumes. Look for the paperback version or the full (uncondensed) hardbound book for maximum enjoyment.

But If all you can find is the Readers Digest version, I still recommend it highly.

The September Project, Part III

In Part II, I abandoned the idea of downloading the possibly-incorrect version of the driver software for the Bukito, instead opting to explore 3D-modeling software recommended on the Deezmaker website.

I looked at the options and information for each application, and concluded that the Trimble SketchUp application was going to suit us. 

Last night, I downloaded the free (non-commercial) version of SketchUp from their website, installing it with no problems on my Windows v.8.1 PC. I watched another of their YouTube instructional videos, and then opened the program to try for myself.


First WHUH?! Is Mine

I fought with the software for a while, not seeing the same options and presentation as the videos. I ran the first two videos again, and saw that, to start with, I had jumped ahead when I selected a template. I had picked the "3D Printing" template as the closest match to what I want to do, not noticing that the videos began with a different template. The "Simple Template" starts with a human figure, with "sky" and "ground" references to make scale and orientation very obvious.


Another issue was that I had missed the instruction in the second video that showed how to open a larger toolset, and this made the program look very different. Once I reviewed the video, I found the location of the toolset selection was the same as the video, but the interface was a little different. No problem, I figured it out fairly quickly.

I really liked the hand-holding inset window, called The Instructor, which launches automatically with the program. It shows with a little animation the basic use of whatever tool is currently selected, and offers step-by-step use instructions, as well as some advanced information via links. Clicking an advanced link opens a new window so you don't lose the basic Instructor. If you close the Instructor inset and then want it back, a typical Help icon opens it from the lower toolbar.

A certain "touchiness" about shifting and moving elements in the drawing felt like a program problem, but is more likely just my position at the left end of the learning curve!


Ready-Made Objects

The Trimble site offers a warehouse of millions of already-defined objects—although most seem to be buildings, landscape designs and other objects not appropriate for printing from the Bukito (whose dimensions have a 5x6x5-inch limit). However, when I search for "planetary gear", I get a list of 22 objects tagged with that label.

Deleting the five accidental matches (Assault Shuttle, Gear motor, L-1 Gunship, Circular saw motor, and Star Frontiers UPI Explorer), I have 17 possible good starting points for my printing efforts.


Biting the Bullet

My spouse was kind enough to offer use of the older PC (usually reserved for spousely networking and writing) as a destination to download the Bukito driver software. So having spent enough time in the diversion of 3D-modeling software, and having located a source for an object to test-print, it's time to get the printer actually printing.

Next step, acquiring the Arduino and Teensyduino drivers.


Thursday, September 11, 2014

Life (or Half-Life) After Death

Sadly, unavailable on Kindle.
Zombies of the Gene Pool:  Layered and nuanced, this Sharon McCrumb tale combines the Appalachian flavor of her Ballad series with her character-driven MacPherson mysteries to present a vision of life after youthful dreams have died. 

The "zombies" of the title are one-time science fiction Fans—that is fans with a capital "F"—whose juvenile attempts at deathless prose were buried in a pickle-jar time capsule in 1954. Since then, the Fan Farm where they wrote their earliest stories, and the time capsule in which they buried them, have been covered by the "Gene Pool" (a lake behind the Gene Breedlove Dam).

When the one-time authors learn that the lake will be drawn down for repairs to the dam, they put their variously-successful lives on hold to get together in a well-publicized reunion to dig up the stories. But more than the pickle jar is waiting to be revealed with the mud of the lake bottom.

The story is probably appealing to some readers for its insider knowledge of SF-Fandom; I enjoyed more the characters that always populate a McCrumb novel. The perennial adolescent in his fifties, the big-name author now drifting in the mists of Alzheimers, the engineer deeply embarrassed by his authorship of Bimbos of the Death Sun (yes, McCrumb gives that title away to one of her writer characters), the schizophrenic Hollywood producer whose authorial alter-ego is occasionally allowed to surface: these characters shamble through the tale dropping bits of decayed life and strange odors of scandal in their wake.

The novel is both akin to and richly unlike McCrumb's Bimbos of the Death Sun, which I enjoyed just as much. They share kooky characters and insider jokes about SFFandom, but Bimbos frolics in the sunshine of the title, while Zombies takes a darker tone from the same elements. 
 

In the end, the Zombies mystery is less about who died and how and why, than it is about why our lives take such strange turns from where we imagine they will go when we are young.

Whether you are a fan of science fiction, or just of Sharon McCrumb, Zombies of the Gene Pool is definitely worthwhile.

Note: Zombies of the Gene Pool is not available on Kindle, but Bimbos of the Death Sun is.

The September Project, Part II

In Part I, I had looked over the assembled Bukito portable 3D printer, and identified a couple of adjustments we would probably have to make to the standard unit, but then I got cold feet about downloading the Win v.7 compatible software to my Win v.8.1 computer. Overnight deliberation didn't make me any more comfortable with the thought.

So I tabled the Arduino and Teensyduino downloads, and decided to look into 3D modeling software instead. The Apps table on the Deezmaker site gives plenty of options for building your own models, and it's something we want to do. 

To be honest, I had expected we would simply download a pre-existing file to test with, maybe the same planetary gear used at Deezmaker to bench-test the unit before they shipped it to us. But I'd rather explore the modeling software, and let the driver software decision rest for another day.


TinkerCAD

Working with my Chromebook and with the Chrome browser on my Windows system, I was attracted first to the TinkerCAD online software, which is listed as compatible with the Chrome and Firefox browsers. You supposedly can set up a free account, so I went there to try it out.

Oh, good! I thought. There are a number of tutorials here that I can watch before I dive into the process. But WHUH?! Click on any of them, and a little green label "DONE" pops up. No tutorial, just false completion. I tried opening a tutorial in a separate tab, and it stayed blank far too long.

So the tutorial doesn't work in Windows with my Chrome browser. I tried opening the site in Firefox next. No good. No difference. It doesn't give me any confidence about the software.


Blender

Blender comes in three "flavors": Mac, Windows and Linux. (With Linux support, I could conceivably run this on my Chromebook.) They also have Blender setup information listed on the Deezmaker site, so it's possible this is a tool that was used by the Bukobot development team. It's not only free, it's Open Source, which is usually a strong plus for me.

Problem is, it really isn't designed primarily as a 3D modeling tool, except on the way to developing animations. Yes, you can hobble the application so it does 3D modeling, but it seems like harnessing a Clydesdale to a Radio Flyer to do so. 

It also seems like a great place to get lost in the distraction of a neat application. Since I know I have a tendency to do this, I don't think Blender is a good choice for me.


AutoDesk 123D Design and Catch

These are two free apps (both proprietary) that let you build your 3D model from a CAD design space or by converting photos of an existing object, which is a pretty slick concept. 

We played with the AutoDesk software for a while as we were exploring which 3D printer to purchase (over 18 months ago now), and even paid to have a sintered porcelain print made from a test shape by a commercial 3D print source.

Many models and shapes in Thingiverse were developed using these applications, but it didn't really "click" for either of us. Perhaps they seemed much more Mac/iOS oriented.


Trimble SketchUp

The table says Trimble SketchUp was formerly Google SketchUp, so that bodes well. The site has a whole Knowledge access page that offers tutorial videos, several levels of Guides, a Help Forum, and other resources. They offer both free access and Professional pricing.

More than that, they have a philosophy of learning that accords with my own: "...play and explore! Right-click a lot, you'll often discover a shortcut menu..."

The tutorials are hosted in YouTube, so I subscribed to the SketchUp channel, and watched the first video. 

I think we have a winner.