Showing posts with label 3D Printing. Show all posts

Saturday, June 11, 2016

Lemon 3D Printer: A "Life" Lesson

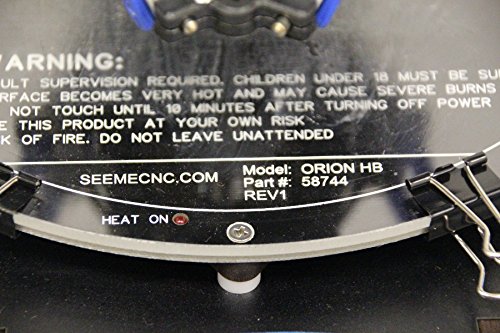
It should say: "WARNING! LEMON!"

Review: Orion Delta 3D Printer from SeeMeCNC


Our Bukito 3D printer reached its end-of-life after a yeoman performance that ran somewhere around 3500 printing hours, over the course of a year and a half. It included lots of transport and "waving" the printer during operation, since the Bukito is designed for portability. 

We knew the Orion Delta, purchased with a MatterControl Touch controller through Amazon, would not match the portability of the Bukito, but we certainly expected a longer life than 75-100 printing hours.

Yes, that's the total. Out of the box, it worked well, and we began to climb the learning curve of the new controller with its dedicated slicing and rendering software. We had just over a month of using the new Delta printer at around half the printing hours per week as the Bukito. Then we began to have heating problems with the unit. 

First to appear were odd blobs of plastic studded on otherwise-smooth objects. Then extrusion began halting mid-output, with models "printing air." The extruder nozzle was still moving above the half-finished object, but no plastic was coming out. Observing conditions when this happened, we noticed the temperature was reading low. Something was wrong with the equipment: either the sensor was misreading, or the extruder was not heating sufficiently. 

We researched the problem online, and discovered many complaints about failure of the heating resistors for this model. One user told of his experience in following the recommended repair of his self-assembled printer: after the resistors were replaced, he had a fire that torched the printer and his workbench.

We don't have to worry, I assured my partner. We bought the unit fully assembled. But no, this is the response we got from SeeMeCNC support on the matter:
It sounds like the issue that you have is with the heating resistors. They have simply come to the end of their life and will need to be replaced. I have attached a PDF that shows where the heating resistors are located on the hot end. [emphasis mine]

The support email concluded with instructions about how to test this diagnosis with a multi-meter and where to obtain parts and a guide to replacing them in the printer.

We told them we were uncomfortable trying this repair at home, and asked for a different option, perhaps a modular replacement that could be plugged in. We got a support ticket number and a promise of followup "within a few days". That was May 30th.

On June 6th, my partner sent a reminder ("Seven days is a few, right?") 

Crickets.

Yesterday, still having heard nothing after 12 days of waiting, we sent an urgent request for an immediate response: "On May 30th, you told us that we would have a reply in a few days. Seven days later, having heard nothing more from you, I sent a reminder, to which we have still had no reply... I don't want to call 'lemon' on this equipment, but saying that we need to essentially rebuild the equipment we purchased from you via Amazon after such a short use is not a reasonable support response."

Still no response. It's a pity, and a waste of the $1200+ we spent to acquire it fully assembled with the dedicated controller. The controller works well, and we can put it to use with our next 3D printer, when we scrape together enough extra funds to purchase one.

But the printer itself is a lemon.

Tuesday, December 23, 2014

Up and Down With the Bukito 3D Printer

Printing from a 3D printer like the Deezmaker Bukito can be an exercise in creative fun, or it can be a frustrating experience. A lot depends on the settings you choose for a wealth of parameters before you turn the printer on, and how you care for the printer between prints.

There are essentially three steps in the software to get a 3D shape to the printer: 
  1. Create the 3D model (usually as an STL or stereo-lithographic file), 
  2. Slice the model into multiple very thin layers parallel to the print bed
  3. Describe the path the print head must follow to generate each layer in terms the printer will understand (the gcode, which also includes other slicer settings that are communicated to the printer, such as extrusion temperature, speed of travel, etc.)
Step 1 involves some kind of CAD program, and may mean reaching a certain point on the learning curve to generate your own 3D model. If you want, you can jump straight past that learning process, and simply download an STL file from Thingiverse, YouMagine, or SketchUp's 3D Warehouse

While this is simple and quick, it does have two downsides: You can only print what you can find. And you don't learn the ins and outs of 3D Model design, so what you choose because it looks good may not print well.

Step 2, the slicing, is the main place that choice of parameters can really affect how well your printer operates. Depending on the slicing program you use, you need to set speed of filament feed (in mm/sec), and heat of extruder as the most basic settings. Next, you choose whether or not to print supports, use a brim or raft (horizontal extensions of the print base that help stabilize a vertical shape), and whether to fill the inside of the shape completely, or to leave some fraction of the space inside as air pockets. The slicer we use, Cura, does not allow us to chose various pocket shapes, but others let you choose between grid, hexagonal, and other shapes for partial fills.

There are dozens of other different parameters that can be set in the slicer, which means thousands of combinations, even when you've eliminated the combos that don't make sense. (For example, you likely wouldn't turn on supports for a predominantly-horizontal shape with a flat bottom, and you probably wouldn't need a raft or brim with it either.) Here is where frustration can set in, because there is no short-cut around playing with the different settings and choices, and accepting that some of them will make your print go south.
Some of the slicer choices you make will cause your print to fail. 
I find it is useful to figure out what the cost of the plastic is for such a failed print. The perspective that comes when you realize that less than 25 cents is being thrown away on a failed print helps to relieve the frustration.


Changing Filament Changes Response

Not only different types of plastic, but different reels of the same type of plastic, can change the way your print will come out (or not come out, as sometimes happens). There are several ways in which plastics can differ, even good quality filaments:

  1. Content, of course: ABS and Nylon will usually require a higher extrusion temperature than PLA, so the gcode file for a PLA print will not work well with Nylon filament.
  2. Consistency and size of diameter: Invest in an inexpensive digital or mechanical calipers so you can check the diameter of the filament (and its consistency along a length of it) before you begin using it. (Harbor Freight has digital calipers that read in either inches or mm for less than $20; often on coupon at less than $12.) If a filament is consistently 1.8 mm in diameter, for example, consider resetting the slicer settings for that higher volume of plastic.
  3. Moisture content: plastic absorbs moisture from the atmosphere. If nylon, for example, isn't stored with a desiccant, or if it's out being used in the printer on a very humid day, changing moisture content can change the plastic's responsiveness to being melted in the extruder.
  4. Other materials or contaminants: "Contaminants" are non-plastic materials that you don't want in the filament, but sometimes you do want something other than the plastic. Consider dyes and colorants. Even at the same base plastic content, same filament diameter, a gold-colored filament will often respond differently than a clear or white (non-colored) plastic.
  5. Beginning of the reel vs. End of the reel: Everything ages. Unless you print an entire reel in a few days, chances are very good the responsiveness of your plastic will change over time. You may need to adjust the slicer settings to accommodate this change.
Bottom line: Filament changes will often require changes to slicer settings in order to get the best quality print.
If your print is failing, it is more likely to be the filament and/or slicer settings than a printer-mechanism problem.
Because there are so many choices possible, however, it can be simpler to assume that a problem is generated by a mechanical failure instead. The benefit is that once you eliminate mechanical problems as a cause, you know the solution lies in making different choices in the slicer.


Don't Forget Machine Maintenance

The thing that has cost us the most in time and parts replacement is build-up in the extruder. A coating of burnt or melted plastic causes the filament to extrude more and more slowly, and the backup pressure on the feeder mechanism can pop loose the Bowden Tube press-fitting. (When this happens, you need to replace that part.)

The excellent cold-pull technique described on the Deezmaker site is the solution to this problem. Simple blockage can be resolved by a fine wire inserted into the extruder nozzle from below. (A single wire pulled from a standard wire brush like those sold for cleaning BBQ grills will serve this purpose.) Once this blockage is cleared, however, chances are very good that a coating of burned/melted plastic remains. The cold-pull can be used to remove the remaining material from the extruder.
Build-up in the extruder can be removed easily, but if left in place it will gradually degrade print quality, and damage the feed mechanisms.

Noodles of plastic that drool out of the extruder (over the edge of the print bed) at the "home" position should be removed when the machine is turned off. We have had our Bukito less than six months, and when it was tipped upside down recently (to demonstrate its portability during a print session at Chick-fil-A), to our surprise six or seven chunks of plastic string dropped out of the base plate around the control board. 

This was despite removing any such noodles that we observed at the beginning of each print; somehow we had missed that many.

And Now, The Weather...

Cold and moisture both can affect the print quality. If you've tried everything else, as we found recently, a change in the thermostat setting for your work area (or a change in the weather outside) can set things right.

When in doubt, just remember that a failed print is only pennies of plastic. As for your time, well, you were going to spend that time printing anyway, right?
Thursday, December 4, 2014

Hedgehogs, 3D Printing and Natural Dyes

Teacup's wool fur was hand-dyed by Connie using eucalyptus.
Chance-met acquaintances and conversations about something other than your novel can add color to your writing, if you let them. If you are open to what can come from not-writing, other than an interruption to the flow.

Take Connie and Tom. We were having breakfast at Chick-fil-A (still my favorite place to write), running my laptop as well as the Bukito 3D printer from the outlet at the end of the bench. 

The printer robot was extruding away, printing a black dragon, thing 17395 from Thingiverse. My spouse was working on a needlepoint canvas and keeping an eye on the printer, while I was "off in Indigo".

Tom came over to check out the printer; Connie was interested in the needlepoint. Then she noticed my Writer At Work door-knob hanger, and the next thing, I was embroiled in a four-way free-wheeling conversation that ranged over printing software and hardware, writing, cooking, NaNoWriMo, dying wool and natural dyes. 

Then Connie dropped a bombshell: Eucalyptus, she informed us, colors wool orange. She knew, because she had made some hand-dyed wool with it.

It happens that I had just named the streets of Indigo using the names of fabrics and dyes, but was coming up short by one dye-named street. I immediately added "Eucalyptus" to my novel notes, and told her so. Then, because Connie had mentioned baking, my spouse picked out a red plastic hedgehog meant to hold toothpicks out of the samples we had printed to give away, and gave it to Connie, explaining that it was ideal for the back of the stove, toothpicks ready to test doneness of baked goodies.

That was Monday. Today, Connie walked up to our table at the restaurant and laid the sweet little wool hedgehog shown above in front of me. She had made it from the eucalyptus-dyed wool in the intervening time. I named it Teacup, and gave it a place of honor on my writing desk.

And how appropriate an orange color this turns out to be for Indigo—dark pumpkin!

Monday, December 1, 2014

Life After November (NaNoWriMo Postscript)

December 1st, even though the novel is not finished yet, is time to come up for air. To write as often, though perhaps not as long each time.

To return from Indigo, and look around, and notice that real life has begun to pile up in the corners.

So the first December project will be a targeted house-cleaning project wrapped around less-extended bouts of writing. 

Once the first draft of Indigo Redemption is complete, it will go "in the drawer", as Stephen King suggests, to wait for a summer edit.

Writing in December, post-NaNovel, will focus on the book Staying Thirsty, begun in the October Project. This collaboration between my spouse and me will doubtless take me into January, if not longer.

The second December project is to get qualified to teach a driver safety class (as a volunteer). Actual teaching will begin in January, so that is a short-lived project, perhaps three days total.

The third December project is to finish the 3D Printing demonstration for middle-school STEM students. We connected with an accelerated charter middle school here, and will present for them as a Beta test. These advanced students will not only have the presentation, but the chance to provide feedback and suggest modifications before it is offered generally. This is the only open project goal from the September Project. It will feel good to complete it before the year ends.

With no new over-arching project in December, I can get back to the original raison d'être of this blog. There are far too many un-reviewed books in the READ collection on my Kindle, or piled on my desk. 

You'll be hearing from me!

Image is h/t to Irishman's Messy Desk at Skyrim Forums, a great RPG and fanfic forum. Not that DrPat has time for RPGs, no... The original (commercial) cartoon was pulled, but you can still view it at Cartoon Stock.

Wednesday, October 1, 2014

The October Project, Part I

East Rand Mines in South Africa, Current Day
For the 45 years we've been married and the 20-some years before we met, my spouse has been collecting life-stories and experiences, polishing and retelling them until they are gem-hard and shining. Until now, family and chance-met acquaintances have been the only ones to hear these travelers' tales.

So in October, we are collaborating on a compilation of these anecdotes. The finished project, tentatively titled Staying Thirsty (a nod to The Most Interesting Man), may not be finished before NaNoWriMo begins on November 1st, but we hope to have a rough draft complete by Halloween. Once the November writing blitz (which will probably focus on my third Indigo novel) is finished, we'll complete the book and publish it. The plan is to publish Staying Thirsty in both eBook and print.

I'll be using the compilation techniques I developed for My Social Calendar 2014-2015, which is now available from Amazon for Kindle. 

That compilation was essentially organized for me; the calendar months and days made a preset structure to compile into. For The October Project, the structure needs to be generated. We have several choices:

  • Chronological (childhood experiences, years at Colorado School of Mines, South African years, etc.)
  • Topical (mining tales; mineral collection; outdoors—skiing, cycling, hiking, etc.)
  • Some combination of the two.

October's Non-Writing Project

Also in October, we will continue The September Project with tasks left from the previous month, as well as production of three new designs from the 3D printer. These may have commercial potential, but for now, are simply part of the plan to "play" with the portable Bukito 3D printer.

Friday, September 12, 2014

The September Project, Part III

In Part II, I abandoned the idea of downloading the possibly-incorrect version of the driver software for the Bukito, instead opting to explore 3D-modeling software recommended on the Deezmaker website.

I looked at the options and information for each application, and concluded that the Trimble SketchUp application was going to suit us. 

Last night, I downloaded the free (non-commercial) version of SketchUp from their website, installing it with no problems on my Windows v.8.1 PC. I watched another of their YouTube instructional videos, and then opened the program to try for myself.


First WHUH?! Is Mine

I fought with the software for a while, not seeing the same options and presentation as the videos. I ran the first two videos again, and saw that, to start with, I had jumped ahead when I selected a template. I had picked the "3D Printing" template as the closest match to what I want to do, not noticing that the videos began with a different template. The "Simple Template" starts with a human figure, with "sky" and "ground" references to make scale and orientation very obvious.


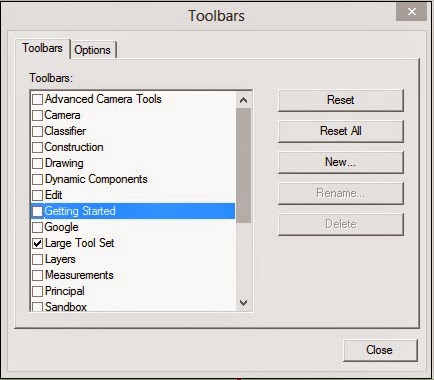
Another issue was that I had missed the instruction in the second video that showed how to open a larger toolset, and this made the program look very different. Once I reviewed the video, I found the location of the toolset selection was the same as the video, but the interface was a little different. No problem, I figured it out fairly quickly.

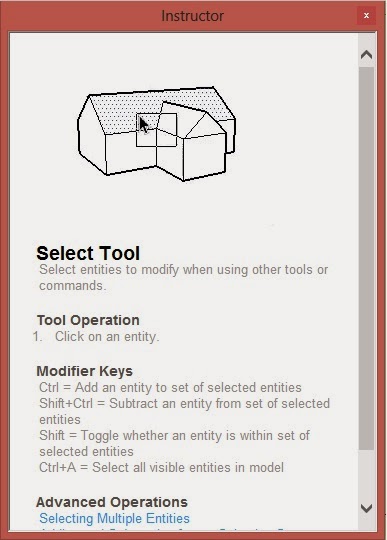
I really liked the hand-holding inset window, called The Instructor, which launches automatically with the program. It shows with a little animation the basic use of whatever tool is currently selected, and offers step-by-step use instructions, as well as some advanced information via links. Clicking an advanced link opens a new window so you don't lose the basic Instructor. If you close the Instructor inset and then want it back, a typical Help icon opens it from the lower toolbar.

A certain "touchiness" about shifting and moving elements in the drawing felt like a program problem, but is more likely just my position at the left end of the learning curve!


Ready-Made Objects

The Trimble site offers a warehouse of millions of already-defined objects—although most seem to be buildings, landscape designs and other objects not appropriate for printing from the Bukito (whose dimensions have a 5x6x5-inch limit). However, when I search for "planetary gear", I get a list of 22 objects tagged with that label.

Deleting the five accidental matches (Assault Shuttle, Gear motor, L-1 Gunship, Circular saw motor, and Star Frontiers UPI Explorer), I have 17 possible good starting points for my printing efforts.


Biting the Bullet

My spouse was kind enough to offer use of the older PC (usually reserved for spousely networking and writing) as a destination to download the Bukito driver software. So having spent enough time in the diversion of 3D-modeling software, and having located a source for an object to test-print, it's time to get the printer actually printing.

Next step, acquiring the Arduino and Teensyduino drivers.


Thursday, September 11, 2014

The September Project, Part II

In Part I, I had looked over the assembled Bukito portable 3D printer, and identified a couple of adjustments we would probably have to make to the standard unit, but then I got cold feet about downloading the Win v.7 compatible software to my Win v.8.1 computer. Overnight deliberation didn't make me any more comfortable with the thought.

So I tabled the Arduino and Teensyduino downloads, and decided to look into 3D modeling software instead. The Apps table on the Deezmaker site gives plenty of options for building your own models, and it's something we want to do. 

To be honest, I had expected we would simply download a pre-existing file to test with, maybe the same planetary gear used at Deezmaker to bench-test the unit before they shipped it to us. But I'd rather explore the modeling software, and let the driver software decision rest for another day.


TinkerCAD

Working with my Chromebook and with the Chrome browser on my Windows system, I was attracted first to the TinkerCAD online software, which is listed as compatible with the Chrome and Firefox browsers. You supposedly can set up a free account, so I went there to try it out.

Oh, good! I thought. There are a number of tutorials here that I can watch before I dive into the process. But WHUH?! Click on any of them, and a little green label "DONE" pops up. No tutorial, just false completion. I tried opening a tutorial in a separate tab, and it stayed blank far too long.

So the tutorial doesn't work in Windows with my Chrome browser. I tried opening the site in Firefox next. No good. No difference. It doesn't give me any confidence about the software.


Blender

Blender comes in three "flavors": Mac, Windows and Linux. (With Linux support, I could conceivably run this on my Chromebook.) They also have Blender setup information listed on the Deezmaker site, so it's possible this is a tool that was used by the Bukobot development team. It's not only free, it's Open Source, which is usually a strong plus for me.

Problem is, it really isn't designed primarily as a 3D modeling tool, except on the way to developing animations. Yes, you can hobble the application so it does 3D modeling, but it seems like harnessing a Clydesdale to a Radio Flyer to do so. 

It also seems like a great place to get lost in the distraction of a neat application. Since I know I have a tendency to do this, I don't think Blender is a good choice for me.


AutoDesk 123D Design and Catch

These are two free apps (both proprietary) that let you build your 3D model from a CAD design space or by converting photos of an existing object, which is a pretty slick concept. 

We played with the AutoDesk software for a while as we were exploring which 3D printer to purchase (over 18 months ago now), and even paid to have a sintered porcelain print made from a test shape by a commercial 3D print source.

Many models and shapes in Thingiverse were developed using these applications, but it didn't really "click" for either of us. Perhaps they seemed much more Mac/iOS oriented.


Trimble SketchUp

The table says Trimble SketchUp was formerly Google SketchUp, so that bodes well. The site has a whole Knowledge access page that offers tutorial videos, several levels of Guides, a Help Forum, and other resources. They offer both free access and Professional pricing.

More than that, they have a philosophy of learning that accords with my own: "...play and explore! Right-click a lot, you'll often discover a shortcut menu..."

The tutorials are hosted in YouTube, so I subscribed to the SketchUp channel, and watched the first video. 

I think we have a winner.

Wednesday, September 10, 2014

The September Project, Part 1

Now that my book is finished and out in the wide world, the next project involves 3D Printing.

Last year we took a share on a Kickstarter proposal to help the established manufacturer Deezmaker to tool up for a new product, the Bukito, a portable 3D printer. The reward for our share was a Bukito printer to be shipped sometime after February 2014. We knew that could mean anytime after February.

The printer arrived after I had already been drawn deep into the weeds of finishing, redrafting, validating and publishing My Social Calendar 2014-2015, so the device sat forlorn next to my spouse's desk for several weeks.

No more!

We were smart enough (lazy enough) to opt for the assembled printer, and it arrived not only assembled, but pre-tested. You can still see the ghost of the planetary gear (similar to 409001 on Thingiverse) they printed to test it on the blue painter's tape mat of the print bed.

Even though our machine was already assembled, I looked through the easy-to-follow and well-illustrated assembly instructions written by Joan Horvath (the aerospace engineer who works at the Deezmaker brick-and-mortar factory in Pasadena, CA.

Good thing I did - there is a jumper on the motherboard that must be moved to allow the printer to be powered other than by USB. This allows us (when needed) to take the printer into a classroom and show off its capabilities without an attached computer. (The 3D printing instructions would come in that case from an SD card.)

We'll need this, because I had planned to use my Chromebook to show off the printer, and there are no drivers for ChromeOS. Unless I want to set the Chromebook up for Linux, that is.

First WHUH?!

The add-on extruder fan we purchased had not been installed onto the printer, and to install it we need to remove the extruder cover. This is securely (really securely) screwed to the extruder mechanism to protect the hot extruder from accidentally contacting the user's fingers, sleeves or other flammables and meltables. One screw is so tightly applied that it cannot be turned without threatening a stripped screw.

My spouse (an engineer, too) said we can just run it slower with PLA filament until we can get the appropriate-size screwdriver to torque out the screw.

Second WHUH?!

The use instructions ("Your First Print") start by telling you to download the "latest FTDI driver for serial communication" and the Arduino software that commands the controller board. "Some users have trouble installing it (especially on Windows 8)", the site warns.

This is not surprising, because there is no specifically Windows 8/8.1-compatible software listed on the download page. Reading through the revision history on that same download page, however, there are notes that 2 and more revs back, certain Windows 8 issues were resolved.

I'll take my reservations under advisement tonight, and see if I feel it's safe to go forward with this version tomorrow.